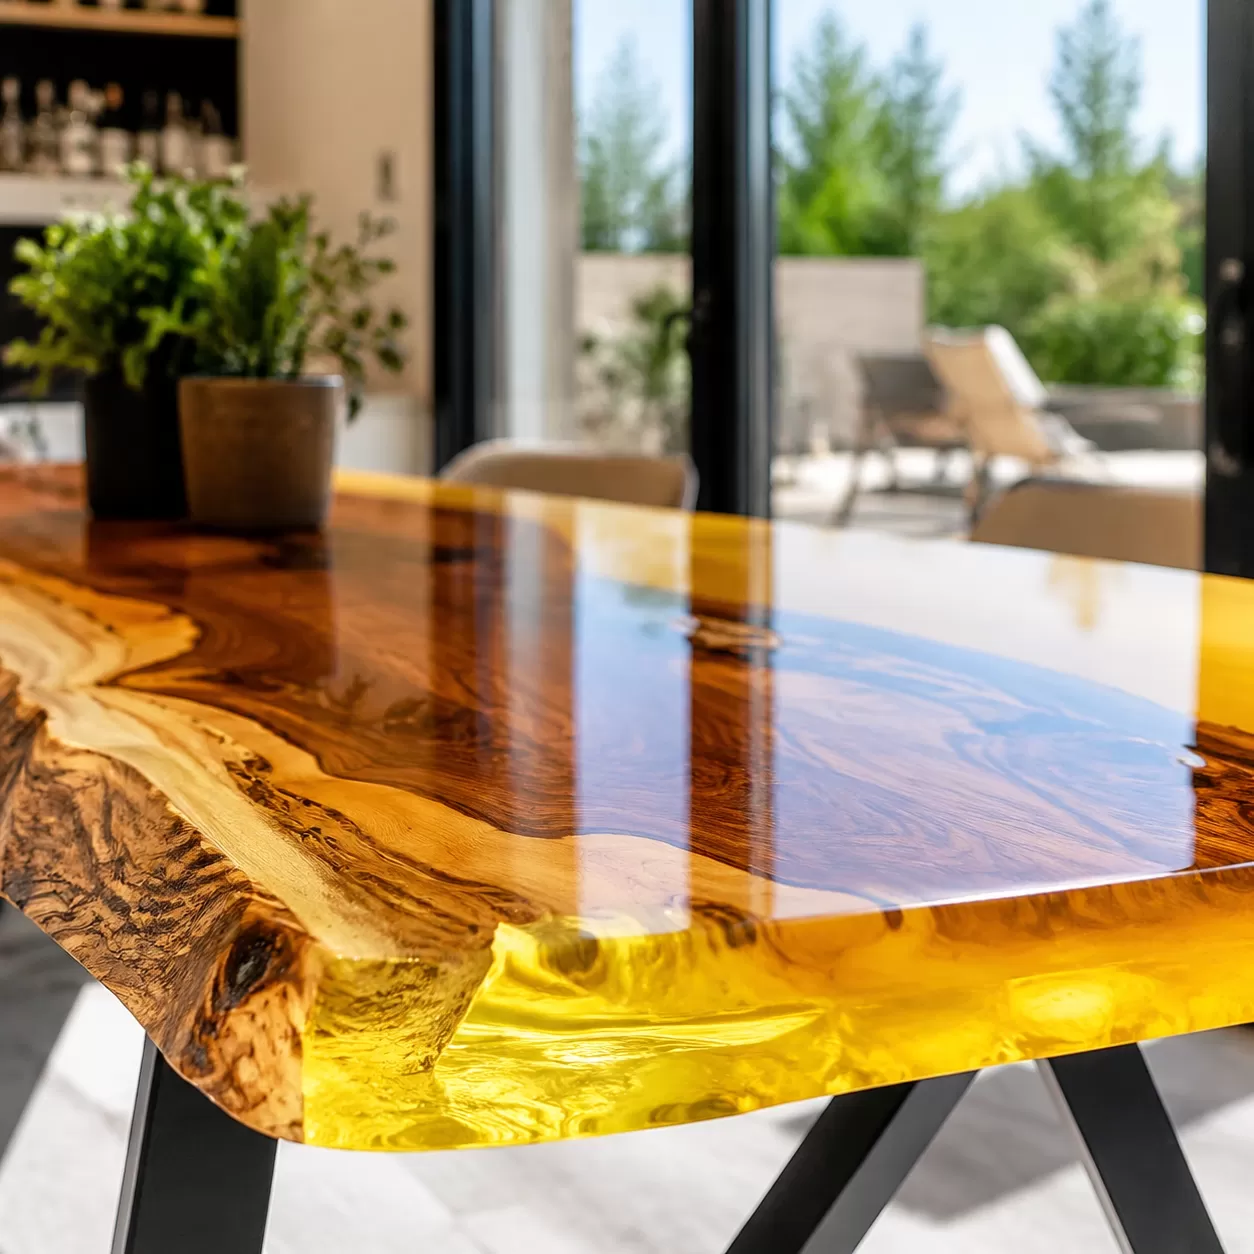
Crystal Clear Table Top Epoxy for Countertops and Bars
Achieving that flawless, “liquid glass” look on a live edge table or a high-traffic bar isn’t just about luck—it’s about using the right chemistry.
If you’ve ever dealt with stubborn bubbles, premature yellowing, or a finish that refuses to level, you know how quickly a dream project can turn into a sticky headache. I’ve spent years in the workshop testing formulas to see what actually stands up to daily wear and tear while maintaining museum-grade clarity.
In this guide, I’m breaking down exactly how to master Crystal Clear Table Top Epoxy Resin for Countertops, Bars & Wood Surfaces. You’ll learn the professional techniques required for a bubble-free pour and why RWATELIER is the go-to choice for a high-gloss finish that stays crystal clear for years.
Let’s dive in.
Why “Crystal Clear” Matters: Key Features to Look For
When I’m working on a high-end countertop or a custom bar top, “clear” isn’t just a color—it’s a standard of quality. A truly Crystal Clear Table Top Epoxy Resin acts like a liquid glass coating, protecting the surface while making the wood grain pop. To get professional results, I focus on four non-negotiable technical features.
UV Resistance & HALS Technology
Yellowing is the enemy of any resin project. I use a formula enriched with HALS (Hindered Amine Light Stabilizers) and UV inhibitors. This dual-action chemistry doesn’t just block sunlight; it chemically intercepts the degradation process.
- UV Inhibitors: Act like sunscreen for your table.
- HALS: Prevents the polymer from breaking down and ambering over time.
- Result: A finish that stays transparent, even in rooms with heavy natural light.
Self-Leveling Properties
Manual smoothing usually leads to trowel marks and uneven dips. My self-leveling resin is engineered to find its own level automatically. Once poured, the chemistry does the heavy lifting to create a high-gloss finish that is perfectly flat.
| Feature | Benefit |
|---|---|
| Automatic Leveling | Eliminates sanding between coats |
| Mirror-Like Surface | High light reflectivity for a premium look |
| Uniform Thickness | Ensures consistent impact resistance across the slab |
Air Release Formulation
Bubbles are the most common frustration in epoxy work. I prioritize an air release formulation that allows trapped air to rise to the surface and pop naturally before the pot life expires. This “degassing” technology is the secret to a bubble-free pour without needing industrial vacuum chambers.
Scratch and Heat Resistance
Bars and kitchen surfaces take a beating. A high-quality bar top coating must offer superior Shore D hardness to withstand sliding glassware and daily use.
- Heat-Resistant Epoxy: Protects against “blushing” or rings from warm coffee mugs.
- Impact Resistance: Prevents chipping from dropped utensils.
- Durability: Provides a long-term polymer coating that handles high-traffic commercial environments.
Where to Apply Crystal Clear Table Top Epoxy Resin
Choosing the right surface for your project is the first step toward a professional result. Our Crystal Clear Table Top Epoxy Resin for Countertops, Bars & Wood Surfaces is designed to bond with various materials, providing a liquid glass coating that is as functional as it is beautiful.
Wooden Countertops and Kitchen Islands
In American kitchens, wood brings a warmth that stone can’t match. Applying a high-gloss finish to wooden countertops does more than just look good; it creates a 100% waterproof seal.
- Wood grain enhancement: The resin penetrates the fibers, making the natural patterns pop.
- Sanitary surface: It creates a non-porous barrier that is easy to wipe down.
- Durability: Protects butcher block or reclaimed wood from moisture and stains.
Commercial Bar Tops
Bar tops in high-traffic environments face constant abuse from heavy glassware, spilled drinks, and frequent cleaning. Our bar top coating is engineered for maximum impact resistance.
- Heavy-duty protection: Stands up to the sliding of beer mugs and spirit bottles.
- Chemical resistance: Won’t cloud or soften when exposed to alcohol or cleaning agents.
- Professional aesthetics: Gives local pubs and restaurants a high-end, inviting glow.
Live Edge Tables
Live edge slabs are a staple of modern American furniture design. Using a two-part epoxy kit allows you to bridge the gap between raw, rugged nature and a sophisticated modern finish.
- Edge preservation: Seals the delicate bark or sanded live edge to prevent rot or shedding.
- Structural integrity: Fills small cracks and voids, stabilizing the slab for a lifetime of use.
- Crystal clear clarity: Ensures the focus remains on the wood’s character, not the coating.
Furniture Restoration Projects
Don’t toss out that old coffee table or desk. A fresh liquid glass coating can breathe new life into worn-out pieces.
- Surface leveling: Fills in old scratches and dings without the need for extensive wood filler.
- Modernizing: Turns a dated piece of furniture into a contemporary centerpiece with a sleek, reflective shine.
- Cost-effective: Provides a high-end look for a fraction of the cost of new furniture.
Step-by-Step Professional Application Guide for Crystal Clear Table Top Epoxy Resin
Getting a professional, mirror-like finish with Crystal Clear Table Top Epoxy Resin for Countertops, Bars & Wood Surfaces comes down to technique and environment. I have found that skipping even a small detail in the prep phase can ruin an entire pour. Follow these steps to ensure a flawless, high-gloss finish.
Preparation and the 75°F Rule
Before you even open the bottles, your workspace must be right. Temperature control is the most overlooked factor in epoxy success.
- The 75°F Rule: Maintain a consistent temperature between 75°F and 80°F in your workroom. If the resin is too cold, it becomes thick and traps bubbles; if it is too warm, it may cure too quickly.
- Surface Prep: Sand your wood surface to 120-150 grit. Clean it thoroughly with a vacuum and a wipe-down of denatured alcohol to remove every speck of dust.
- Leveling: Ensure your project is perfectly level using a bubble level. This self-leveling resin will follow gravity, so an unlevel table results in an uneven thickness.
Precise Ratios and Mixing Mastery
Most high-quality two-part epoxy kits use a 1:1 mixing ratio by volume. Accuracy here is non-negotiable.
- Measure Twice: Use graduated mixing cups. Pour the hardener first, then the resin. An off-ratio mix leads to sticky spots that never fully cure.
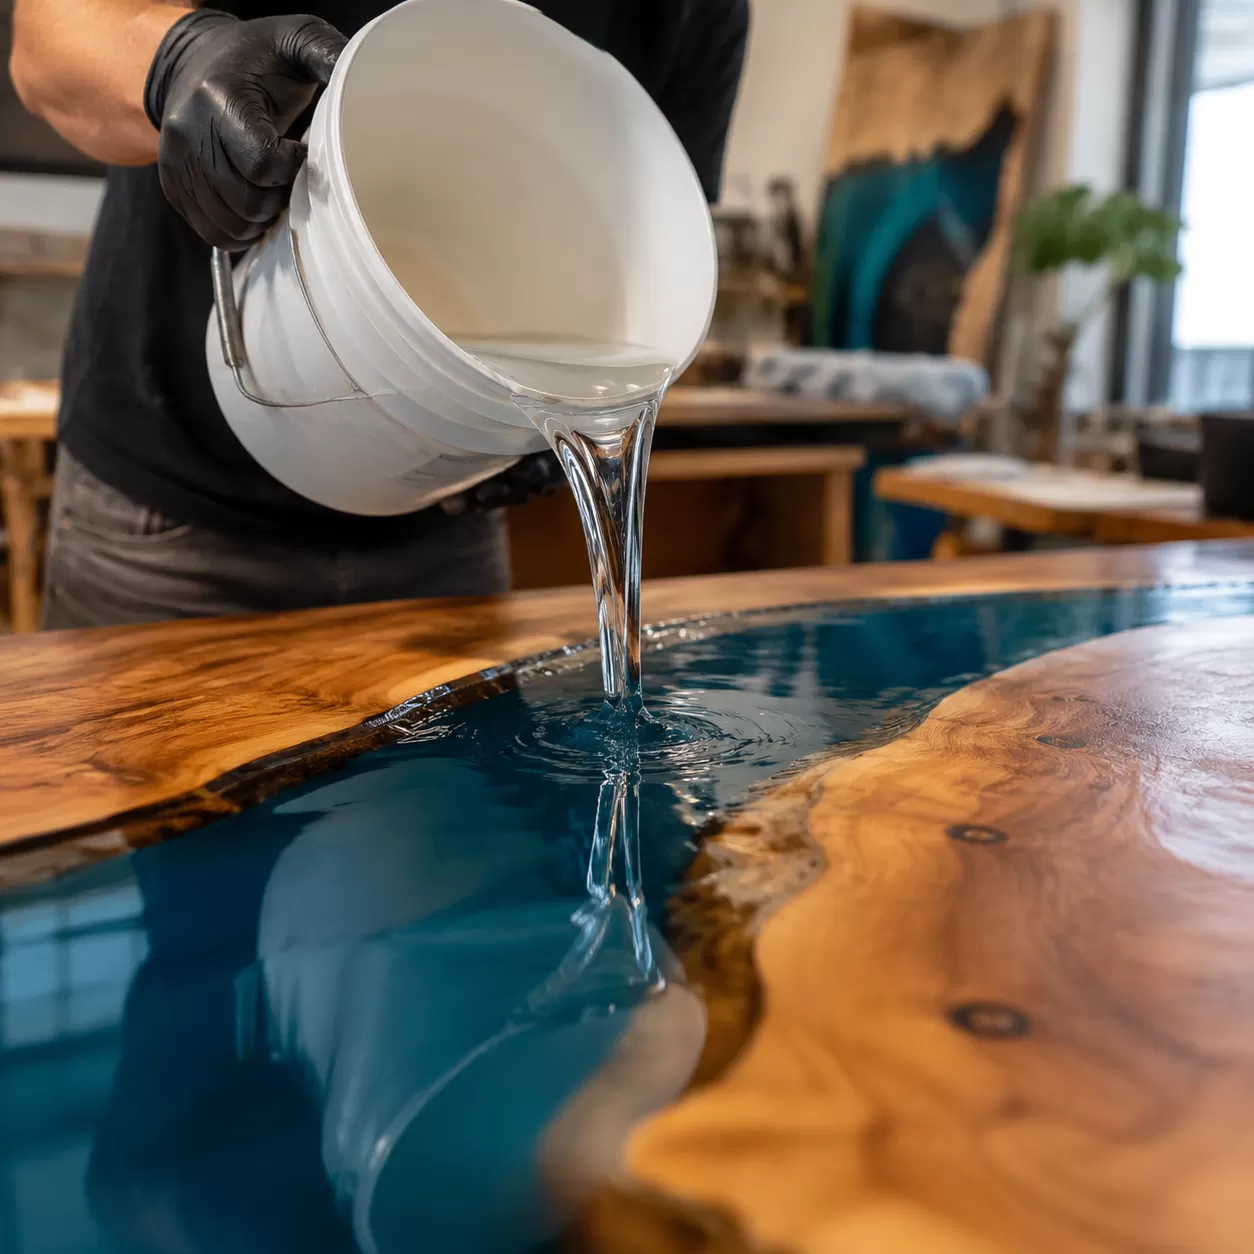
- The Double-Cup Method: Stir the mixture slowly for 3 to 5 minutes, scraping the sides and bottom of the bucket constantly. To ensure a bubble-free pour, pour the mixture into a second clean container and stir for another minute. This prevents unmixed resin from the walls of the first bucket from ending up on your table.
The Seal Coat vs. The Flood Coat
I always recommend a two-stage pour for porous surfaces like wood to prevent “off-gassing,” which causes air bubbles to rise from the wood grain.
- The Seal Coat: This is a thin layer of epoxy brushed over the entire surface. It acts as a barrier, sealing the pores of the wood. Let this sit until it is tacky (usually 4-6 hours).
- The Flood Coat: This is the main pour. Pour the resin in the center and let it flow to the edges. This liquid glass coating should be about 1/8″ thick. Use a heat gun or torch to lightly pass over the surface to pop any remaining surface bubbles.
Curing Timeline and Expectations
Patience is the final ingredient for a durable bar top coating. While the resin may look finished quickly, it needs time to reach its full Shore D hardness.
- 24 Hours: The surface is “dust-dry.” It will be hard to the touch, but still susceptible to denting. Do not place objects on it.
- 48–72 Hours: The epoxy has reached a functional cure. You can move the piece, but avoid heavy use or sliding items across the surface.
- 7 Days: Full chemical cure. At this point, the resin has achieved maximum impact resistance and heat stability, making it ready for daily use on countertops and bars.
Common Pitfalls with Crystal Clear Table Top Epoxy Resin
Even with a high-quality two-part epoxy kit, things can go sideways if you don’t respect the chemistry. Achieving that perfect liquid glass coating requires avoiding a few common mistakes that often trip up DIYers and pros alike.
Solving Cloudiness and Blushing
If your finish looks milky or hazy instead of crystal clear, you’re likely dealing with “blushing.” This happens when moisture in the air reacts with the hardener.
- Watch the Humidity: Keep your workspace below 50% humidity. If it’s a rainy day, run a dehumidifier.
- Temperature Stability: Avoid big temperature swings during the first 24 hours of curing.
Eliminating Sticky Spots and Soft Tacky Areas
Nothing is more frustrating than a bar top coating that stays sticky. This is almost always caused by improper measuring or incomplete mixing.
- The 1:1 Ratio: Most Crystal Clear Table Top Epoxy Resin for Countertops, Bars & Wood Surfaces requires a precise volume ratio. Use graduated mixing cups—never “eyeball” it.
- Scrape the Sides: When mixing, resin clings to the walls and bottom of the bucket. If that unmixed resin ends up on your table, it won’t cure.
- Double Pot Method: Mix in one container, pour it into a second clean container, and mix again to ensure total consistency.
Dust Control and the “Clean Room” Environment
Since this resin is designed for a high-gloss finish, every tiny speck of dust will look like a mountain under a microscope.
- Seal the Room: Turn off ceiling fans and close vents that might blow dust onto your wet surface.
- The “Tent” Trick: Once you finish your bubble-free pour, cover the project with a clean plastic sheet or a cardboard “tent” to catch falling debris while it sets.
- Prep Your Clothes: Avoid wearing fuzzy sweaters or fabrics that shed lint while you’re working over the wet resin.
Preventing Surface Dimples
Small craters or “fish eyes” happen when the resin pulls away from a spot on the surface, usually due to oil or silicone contamination.
- Wipe it Down: Clean your wood or countertop thoroughly with 99% Isopropyl alcohol before the pour.
- No Aerosols: Don’t use hairspray or spray cleaners anywhere near your project site on pour day.
Maintenance and Longevity of Your Crystal Clear Table Top Epoxy Resin
Once your project cures, the goal is to keep that liquid glass look for years. While our Crystal Clear Table Top Epoxy Resin for Countertops, Bars & Wood Surfaces is built for durability, a little smart upkeep goes a long way in preserving the high-gloss finish.
Cleaning Tips for a Lasting Shine
Maintaining a pristine surface doesn’t require expensive chemicals. In fact, simple is better.
- Stick to Mild Soap: Use warm water and a few drops of dish soap. This is the safest way to remove grease and grime without affecting the resin’s clarity.
- Microfiber Only: Always use a clean, soft microfiber cloth. Avoid paper towels or scrub pads, as these can create micro-scratches that dull the surface over time.
- Skip the Harsh Stuff: Never use cleaners containing bleach, ammonia, or vinegar. These acidic or abrasive substances can break down the surface gloss and lead to a cloudy appearance.
- Coasters and Trivets: Even though the resin has high heat resistance, I always recommend using coasters for hot mugs and trivets for pans straight off the stove to prevent potential blushing or softening.
Repairing Minor Scratches and Scuffs
Life happens, especially on high-traffic bar tops. If your surface picks up a few light scratches, you don’t need to pour a new coat. Because of the resin’s high Shore D hardness, most marks are just on the very surface.
- Clean the Surface: Ensure the area is completely free of dust or oils.
- Fine Sanding: For noticeable scuffs, lightly wet-sand the spot using 2000 or 3000 grit sandpaper. This will temporarily dull the area, which is normal.
- Polishing Compound: Apply a high-quality automotive polishing compound or a specialized resin polish to the sanded area.
- Buffing: Use a soft buffing pad or a mechanical buffer on a low setting. Work in circular motions until the liquid glass coating matches the rest of the table.
By following these steps, you ensure your investment maintains its impact resistance and crystal-clear transparency for the long haul.
Why Choose RWATELIER for Your Crystal Clear Table Top Epoxy Resin
I built RWATELIER because I saw a gap in the market for a professional-grade resin that doesn’t require a gas mask to use. We’ve engineered our Crystal Clear Table Top Epoxy Resin to meet the high standards of American woodworkers and homeowners who demand a “liquid glass” finish without the toxic headache.
Our Commitment to Quality
When you choose our resin for your countertops, bars, or wood surfaces, you are getting a formula designed for safety and durability. We prioritize a clean working environment and a long-lasting result.
- VOC-Free & Low Odor: You can work indoors without harsh chemical fumes. It’s better for your lungs and your home.
- Food-Safe Once Cured: Our resin is compliant for incidental food contact, making it the go-to choice for kitchen islands and dining tables.
- Superior Shore D Hardness: Once fully cured, it provides a rock-hard, scratch-resistant barrier that stands up to daily use.
RWATELIER vs. Standard Retail Resins
| Feature | RWATELIER Epoxy | Standard Hardware Store Resin |
|---|---|---|
| Clarity | Ultra-Transparent / Non-Yellowing | Often develops a yellow tint |
| Safety | VOC-Free & Food-Safe* | High VOCs & Strong Odors |
| Leveling | Advanced Self-Leveling | Requires manual spreading |
| Durability | High Heat & Impact Resistance | Prone to dents and scratches |
Professional Results for Every Project
Our community of makers ranges from professional contractors to first-time DIYers. The reason they stick with RWATELIER is the consistency of the pour. Whether you are sealing a high-traffic commercial bar top or a sentimental live-edge coffee table, our Crystal Clear Table Top Epoxy Resin delivers a mirror-like, high-gloss finish every single time. We don’t just sell a product; we provide the reliability you need to ensure your hard work on a wood surface doesn’t go to waste.
FAQs for Crystal Clear Table Top Epoxy Resin
We get a lot of questions from customers looking to achieve that perfect liquid glass coating. Here are the most common questions we hear about working with Crystal Clear Table Top Epoxy Resin for Countertops, Bars & Wood Surfaces.
How long does table top epoxy take to dry?
Drying time heavily depends on your room’s temperature. Generally, you have a pot life of about 20 to 30 minutes to work with the mixed material. The surface will be dry to the touch within 24 hours. However, you should wait a full 72 hours for the epoxy to fully cure and reach its maximum Shore D hardness before placing heavy objects or appliances on it.
Is epoxy resin safe for food contact on countertops?
Yes. Once our VOC-free epoxy is mixed at the correct ratio and fully cured, it becomes a completely inert, food-safe resin. This makes it an ideal, reliable choice for kitchen islands, dining tables, and serving boards where food might come into direct contact with the surface.
How do I get bubbles out of my epoxy finish?
Achieving a bubble-free pour is straightforward if you use the right tools. Right after spreading your high-gloss finish, pass a heat gun or a small propane torch quickly over the wet surface, keeping the flame a few inches away. The heat instantly forces trapped air bubbles to rise and pop, leaving behind a perfectly smooth, crystal clear surface.
Can I use table top resin for deep pours?
No. Table top formulas are engineered specifically for thin, self-leveling layers—usually up to 1/8 or 1/4 inch thick per pour. If you try to pour this polymer coating too thick in a single pass, the chemical reaction will overheat, causing the resin to yellow, smoke, or crack. For thick river tables, you need a dedicated deep pour casting resin instead.
How much epoxy do I need for a standard bar top?
Coverage depends on the thickness of your pour and how porous your surface is. As a general rule of thumb:
- Seal Coat: A very thin layer to lock in air and prevent bubbles.
- Flood Coat: A standard 1-gallon two-part epoxy kit covers approximately 16 to 20 square feet at a 1/8-inch thickness.
Always calculate your exact square footage before starting, and buy a little extra to ensure you don’t run out halfway through applying your final bar top coating.