Bubble Free Epoxy Resin Guide Structure Features and Process
Understanding Air Bubble Sources in Epoxy Resin
Achieving a flawless, optical-clear finish with bubble free epoxy resin requires understanding why bubbles form in the first place. Trapped air ruins the structural integrity and aesthetics of your cast. By identifying the root causes, you can take proactive steps to prevent the curing bubbles issue before the resin hardens.
Mixing Introduces Air
The primary cause of air entrapment happens during the preparation stage. Mechanical agitation mechanically forces air into the liquid matrix.
-
- Aggressive Stirring: Whipping the resin and hardener too fast acts like a whisk, trapping thousands of micro-bubbles.
- Vortex Formation: Stirring in a single, high-speed circular motion creates a vortex that sucks ambient air down into the mixture.
- Improper Tools: Using wooden stir sticks with porous surfaces or lifting the spatula out of the liquid mid-mix introduces unnecessary air pockets.
Environmental Humidity Impacts
Moisture is a silent enemy of clear casting resin. High ambient humidity directly interferes with the chemical reaction between the resin and the hardener.
-
- Moisture Absorption: Polyurethane and certain epoxy components are highly hygroscopic, meaning they readily absorb water vapor from the air.
- Chemical Off-gassing: When moisture reacts with the hardener, it can trigger a secondary chemical reaction that releases carbon dioxide ($CO_2$) gas, leaving behind a cloudy, bubbly texture.
- Blushing Effects: Excess humidity can cause a surface film or “blush” that traps rising bubbles right beneath the top layer.
High Viscosity Hinders De-airing
A resin’s thickness determines how easily trapped air can escape before the gel timer runs out.
-
- Slow Bubble Migration: In thick liquids, the buoyancy of small air bubbles cannot overcome the fluid resistance, pinning them in place.
- Narrow Self-Degassing Window: High-viscosity formulas lock air in place. Without a specialized low viscosity resin, natural air bubble removal becomes physically impossible before the material cures.
| Factor | Impact on Bubble Formation | Prevention Strategy |
|---|---|---|
| Mixing Speed | High mechanical air injection | Slow, deliberate folding motions |
| Humidity (>60%) | Chemical gas generation ($CO_2$) | Climate-controlled workspace |
| High Viscosity | Traps air permanently | Use self degassing formulas |
Product Structure Optimization for Bubble Free Epoxy Resin
Trapped air isn’t just a chemistry problem—it is often a design flaw. When pouring a bubble free epoxy resin, the physical structure of your mold or product housing plays a massive role in whether air escapes or stays trapped forever. Making a few smart tweaks to your product structure can completely eliminate the need for intense post-cure fixes.
Glue Groove Design Improvements
Standard sharp corners and deep, narrow channels are notorious for trapping air pockets. To achieve a flawless finish, product channels must be optimized for natural fluid movement.
-
- Ramped and Rounded Corners: Replace sharp 90 ° internal angles with generous radiuses. Smooth, curved transitions allow the liquid to flow seamlessly without creating dead zones where air gets locked in.
- Wider Flow Channels: Narrow channels create high flow resistance. Widening the path helps low viscosity resin displace air evenly as it fills the cavity.
- Sloped Bottoms: Designing a slight incline in the groove helps guide the liquid from the lowest point upward, pushing air out naturally ahead of the material front.
Smart Air Vent Placement
If air has no escape route, even a self degassing formula can fail. Strategic venting ensures that air displaced by the incoming resin has an immediate exit point.
| Vent Feature | Ideal Optimization | Function |
|---|---|---|
| Highest Point Placement | Position vents at the absolute peak of the mold cavity. | Prevents air from being trapped in upper blind spots as the resin rises. |
| Overflow Reservoir | Add a small overflow well at the vent exit. | Ensures the part fills completely while catching any initial curing bubbles issue at the surface. |
| Split-Line Venting | Integrate micro-grooves along the mold mating lines. | Allows air to bleed out continuously without causing resin leakage. |
3. Why 3136AB-0 is the Ultimate Bubble Free Epoxy Resin
3.1 Low Viscosity Resin for Superior Fluidity
We designed our 3136AB-0 formula to tackle the root cause of trapped air: high thickness. This low viscosity resin flows effortlessly into intricate molds and tight crevices, ensuring complete coverage without trapping air underneath.
-
- Water-like flow: Its high fluidity allows air to rise to the surface naturally before the gelling process begins.
- Self degassing power: The thin consistency minimizes friction, making it incredibly easy for micro-bubbles to escape on their own.
- Deep penetration: Excellent wetting properties mean it bonds perfectly to substrates without creating dry spots or air pockets.
3.2 Extended Curing Time and Optimal Air Bubble Removal Window
Achieving a flawless, crystal-clear finish requires patience from the chemical formula. 3136AB-0 features a precisely engineered open time that maximizes your air bubble removal window.
| Feature | 3136AB-0 Performance | Benefit to User |
|---|---|---|
| Pot Life | Extended working time | Ample time to mix, pour, and let bubbles rise |
| Curing Window | Controlled, gradual reaction | Prevents curing bubbles issue caused by overheating |
| Exotherm Control | Low peak temperature | Eliminates thermal shock and shrinkage gaps |
By lengthening the initial gel phase, this clear casting resin gives trapped air the time it needs to vanish, ensuring a premium, glass-like result every single time.
4. Application Control Methods for Bubble Free Epoxy Resin
Getting a flawless, crystal-clear finish depends heavily on your handling technique. Even the best self degassing formulas require proper application control to eliminate the risk of trapping air during the pour.
4.1 Mixing Ratios and Techniques
Achieving a bubble free epoxy resin finish starts with precise measurement and a disciplined mixing technique. Incorrect ratios alter the chemical reaction, while aggressive stirring introduces unwanted macro-bubbles.
-
- Stick to Exact Ratios: Always measure your resin and hardener strictly according to the product guidelines. Off-ratio mixing slows down the cure or creates weak spots that trap gases.
- Mix Slowly and Deliberately: Use a flat-edge stir stick. Scrape the bottom and sides of the mixing container continuously. Avoid lifting the stick out of the liquid to prevent whipping air into the mixture.
- The Two-Container Method: Transfer the blended mixture into a second clean container and mix for another minute. This ensures unmixed material from the walls doesn’t ruin your clear casting resin project.
4.2 Pouring Speed and Angles
The way you dispense the liquid determines whether you push air out or lock it in. Controlling your pouring speed and angle is a critical step in preventing the curing bubbles issue entirely.
| Pouring Factor | Correct Approach | Why It Works |
|---|---|---|
| Pouring Height | Low and steady, close to the surface | Minimizes the distance the liquid falls, preventing air entrapment. |
| Pouring Angle | Pour down the side wall or a stir stick | Allows the low viscosity resin to flow smoothly and displace air naturally. |
| Flow Speed | Slow, continuous stream | Gives the material time to fill corners and gaps without creating air pockets. |
5. Air Bubble Removal Methods for Bubble Free Epoxy Resin
Getting a flawless, crystal-clear finish requires the right degasification techniques. If you want to achieve a truly bubble free epoxy resin surface, we rely on three industry-proven methods to eliminate trapped air before and during the curing process.
5.1 Vacuum Degassing
For high-volume production and critical casting projects, a vacuum chamber is the most reliable tool for air bubble removal.
-
- How it works: Placing the mixed resin in a vacuum chamber forces trapped air to expand and rise to the surface instantly.
- Best for: Thick pours and deep clear casting resin projects where deep-seated bubbles cannot escape on their own.
- Pro Tip: Choose a container with at least three times the volume of the liquid, as the resin will foam up significantly before collapsing into a completely clear, bubble-free state.
5.2 Heat Gun and Torch Techniques
When dealing with surface bubbles or shallow pours, applying localized heat is the quickest way to pop stubborn pockets of air.
-
- Thermal Expansion: Passing a heat gun or propane torch quickly over the surface warms the top layer of the resin. This lowers its viscosity temporarily, allowing bubbles to burst immediately.
- Execution: Keep the heat source moving constantly at an angle about 6 to 8 inches away from the surface.
- Warning: Never hold the heat in one spot for too long, as overheating can cause yellowing, scorching, or premature curing issues.
5.3 Static Degassing (Self Degassing)
If you are working with a high-quality low viscosity resin, you can let gravity and chemistry do the heavy lifting through self degassing.
| Step | Action | Purpose |
|---|---|---|
| 1 | Let the mixture sit for 5–10 minutes after mixing. | Allows major air pockets to rise to the top naturally. |
| 2 | Keep the room temperature optimized at 75°F–80°F. | Maintains a thin consistency so air can escape easily. |
| 3 | Pour the resin in a long, thin stream from a low height. | Prevents churning new air back into the mold during application. |
Real-World Comparison: Defective vs. Bubble Free Epoxy Resin
Achieving a flawless, crystal-clear finish requires the right material and technique. When we look at the actual cross-sections of cured projects, the difference between a failed pour and a professional-grade result comes down entirely to how air is managed during the process.
Defective Cross-Section with Curing Bubbles Issue
When using standard formulas or incorrect pouring methods, trapped air ruins the structural and visual quality of the piece.
-
- Internal Micro-Bubbles: A dense cloud of tiny pockets remains suspended permanently because the material hardened before they could escape.
- Structural Weak Spots: Large voids inside the cured layer compromise the physical strength of the product, making it prone to cracking under stress.
- Surface Blemishes: Bubbles that pop too late leave permanent craters, pits, and a foggy appearance on what should be a transparent surface.
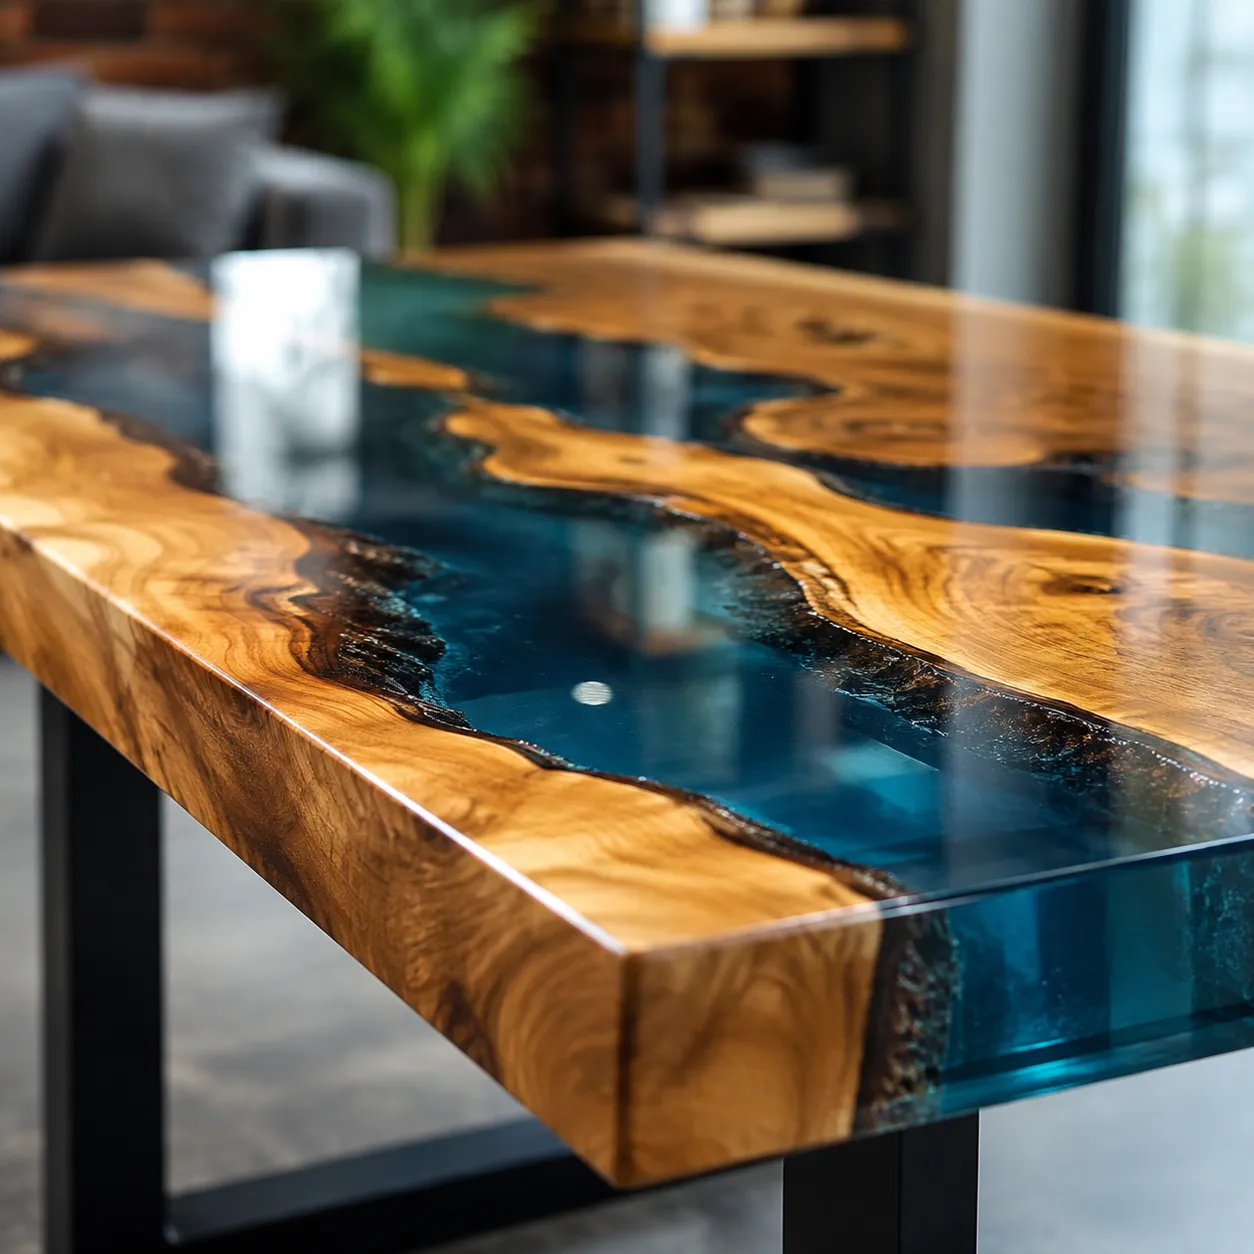
Flawless Showcase Using Bubble Free Epoxy Resin
By switching to a specialized clear casting resin and using proper air bubble removal techniques, you get a premium, factory-quality finish every single time.
| Feature | Defective Pour | Premium Bubble Free Pour |
|---|---|---|
| Clarity | Cloudy, hazy, and full of air pockets | Optical clarity, completely transparent |
| Surface Finish | Rough, pitted, and uneven | Mirror-like, perfectly smooth |
| Strength | Weakened by internal voids | Solid, uniform, and highly durable |
Our low viscosity resin is engineered with self degassing properties that allow air to rise and pop naturally before the gel time kicks in. The result is a perfectly clear, glass-like structure free of any imperfections.
