How to Apply Clear Epoxy Topcoat Over Artwork Expert Guide
Quick Answer
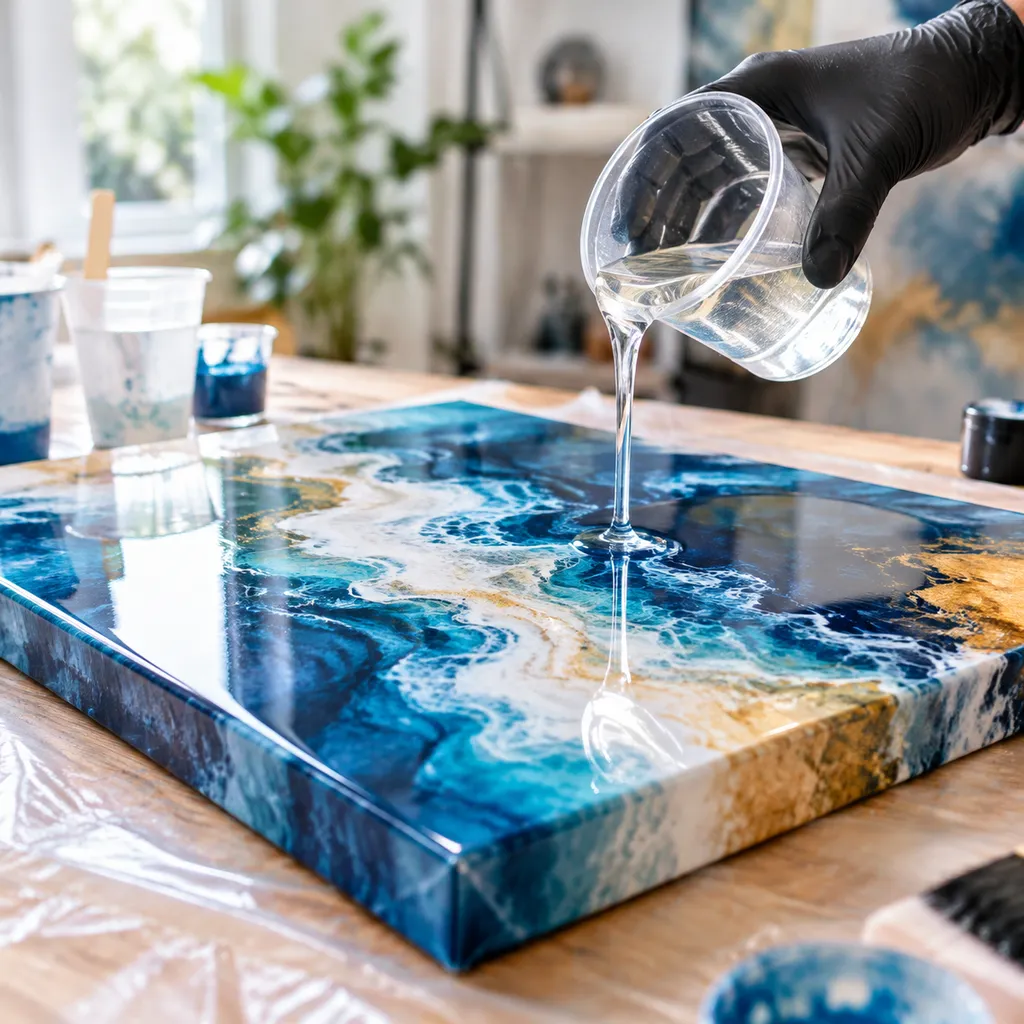
Applying a clear epoxy topcoat over artwork is the professional standard for achieving a high-gloss, glass-like finish while ensuring long-term preservation. This process involves using a specially formulated art resin that features self-leveling properties and UV-resistant chemistry to protect canvases, wood panels, and mixed-media pieces from dust, moisture, and fading. For optimal results, use a 1:1 ratio epoxy to ensure a crystal-clear, durable seal that magnifies color depth and creates a protective, rock-hard shield over your completed work.
What Buyers Need to Know First
Applying a clear epoxy topcoat over artwork creates a permanent, glass-like seal that elevates color contrast and locks in long-term surface protection. Before purchasing or pouring an art coating epoxy, there are a few technical fundamentals every creator needs to account for to ensure a flawless cure.
Core Specifications at a Glance
- Formulation Type: Surface coating resin (designed for thin pours between 1/16″ and 1/8″), distinct from deep-cast systems.
- Mixing Ratio: Precise 1:1 ratio by volume. Guesswork or uneven measuring leads to sticky spots and uncured patches.
- Working Time: 30 to 45 minutes of pot life at standard room temperature (70°F–75°F / 21°C–24°C).
- Curing Windows: Tack-free and dust-resistant within 8 to 12 hours; fully cured to maximum scratch resistance within 72 hours.
| Factor | Requirement | Impact on Finished Art |
|---|---|---|
| Ambient Temperature | 70°F–75°F (21°C–24°C) | Prevents orange peel textures, cloudy finishes, and slow curing. |
| Substrate Moisture | Completely dry / cured | Moisture or uncured oil paint creates hazing and delamination. |
| Pour Thickness | 1/16″ to 1/8″ per layer | Ensures natural self-leveling and proper heat dissipation without scorching. |
| Work Area | Dust-free & level | Keeps the high-gloss surface clean while curing during the critical 12-hour window. |
Choosing an artwork protection resin requires matching the chemistry to your process. A dedicated high gloss art resin is engineered with balanced surface tension to self-level and release bubbles quickly, giving you a smooth, mirror finish without altering your original colors.
When Epoxy Is Suitable Over Artwork
Using a clear epoxy topcoat is an excellent way to provide a museum-grade finish to your creative projects. Epoxy excels at adding depth, intensifying colors, and providing a durable, glass-like shield against dust, moisture, and minor wear. It is the preferred choice for artists looking to transform flat surfaces into professional, high-gloss displays that stand the test of time.
Surface Compatibility and Test Patches
Before applying a clear epoxy topcoat over artwork, you must ensure the substrate is compatible. Our resin systems bond reliably to a variety of standard art materials:
- Canvas & Wood: Ideal for cradled panels or stretched canvases that have been properly primed.
- Media: Works beautifully over cured acrylic paints, oil paints (provided they are fully dry), watercolors, and sealed printed photography.
- Sealing: Porous materials—such as paper, raw wood, or watercolor paintings—must be pre-sealed to prevent air from escaping the surface, which causes bubbles.
Best Practices for Success:
Test Patch: Always perform a test on a scrap piece of the same material before committing to your final artwork. This verifies how the resin interacts with your specific pigments and ensures you are happy with the finish.
Curing: Ensure all layers of paint or mixed media underneath are completely cured. Applying resin over uncured or “wet” layers can lead to adhesion failure or surface distortion.
Preparation: Your workspace must be perfectly level to ensure the self-leveling formula creates an even, consistent layer across the entire piece.
Thin-Coat Flow and Leveling
Achieving a professional-grade clear epoxy topcoat over artwork relies heavily on the self-leveling nature of the resin. When applying your coating, the resin’s viscosity is designed to flow naturally across the surface, effectively filling in minor textures and minimizing brush marks or trowel ridges.
To ensure the best results, keep these application tips in mind:
Elevate your work: Always place your canvas or wood panel on a level surface using risers to allow the resin to drape over the edges cleanly.
Controlled spreading: Use a notched spreader or a clean squeegee to gently guide the resin to the edges, letting the material’s natural flow do the heavy lifting.
Layer thickness: Aim for a thickness of 1/16″ to 1/8″ per layer. This prevents excessive runoff while ensuring a uniform, glass-like finish.
Bubble Control and Clarity
Even the highest quality art coating epoxy can trap air during the mixing process. Because we prioritize bubble-free clear epoxy, our formulas are designed with low surface tension to help trapped air escape to the surface naturally.
To achieve that signature high-gloss, crystal-clear finish:
The Torch Technique: After pouring, quickly sweep a heat gun or propane torch over the surface using a constant, sweeping motion. This reduces the resin’s surface tension, allowing micro-bubbles to burst instantly.
Avoid Overheating: Keep the heat source moving at all times to prevent scorching the resin or the artwork beneath.
Timing: Perform this step within the first few minutes after spreading. If you wait too long as the resin begins its cure cycle, you risk disrupting the surface finish.
By managing the flow and using heat to release trapped air, you ensure your clear epoxy topcoat preserves the integrity of your work while providing a durable, high-gloss magnification of your colors.
UV Exposure and Yellowing
Sunlight and ambient indoor lighting can ruin a piece if your resin lacks the right stabilizers. Standard resins often degrade and develop an amber tint over time, which distorts pigments and muddies bright whites.
To solve this, our clear epoxy topcoat over artwork uses an advanced dual-action protection system:
- UV Absorbers: These additives intercept ultraviolet wavelengths at the surface, neutralizing radiation before it attacks the epoxy polymer chain.
- HALS (Hindered Amine Light Stabilizers): Light stabilizers work inside the coating to scavenge free radicals, stopping premature aging, clouding, and discoloration.
- Long-Term Color Integrity: Whites stay pure white, and high-contrast photography or acrylics keep their original saturation without optical shift.
Hardness, Gloss and Final Surface Quality
The goal of an artwork protection resin is simple: complete optical transparency paired with durable physical defense. Once poured, the resin settles into a mirror-flat, glass-like topcoat that brings out deep color contrasts without brush marks or surface waviness.
After application, the surface cures into a rigid, durable barrier that seals your art against moisture, mild heat, and mechanical scuffs:
| Stage | Timeline (at 70°F–75°F / 21°C–24°C) | Surface Condition |
|---|---|---|
| Dust-Free | 8 to 12 hours | Surface skins over; airborne dust will no longer stick. |
| Handleable | 12 to 24 hours | Safe to move, pack carefully, or prep for a secondary coat. |
| Full Cure | 72 hours | Reaches standard service hardness and high-gloss clarity. |
| Maximum Hardness | Up to 7 days | Full chemical bond develops for peak scratch resistance. |
This curing profile delivers a tough, crystal-clear surface that preserves fine art prints, canvases, and wood panels under daily handling and standard display conditions.
What Information Should You Send to RW ATELIER?
To help us recommend or formulate the ideal clear epoxy topcoat over artwork, share the technical details of your project. As a direct manufacturer and supplier, we tailor our support to your exact production scale—whether you need studio-grade art resin kits or bulk manufacturing orders.
Send our technical team the following project specifications:
- Substrate and Medium: Specify the base material (stretched canvas, cradled wood panel, MDF, or fine art paper) and the pigments used (fully cured acrylics, oils, watercolors, or archival inkjet prints).
- Surface Dimensions and Coverage Area: Include the square footage or exact measurements of your pieces so we can calculate the exact volume required for a standard 1/16″ to 1/8″ protective flood coat.
- Studio and Curing Environment: State your average working room temperature and ambient humidity. Standard applications perform best at 70°F–75°F (21°C–24°C).
- UV Exposure and Display Demands: Note whether the finished work will sit in high-sunlight display areas requiring our advanced HALS-fortified, non-yellowing UV barrier package.
- Order Type and Volume Requirements: Clarify whether you need standardized retail kits (1-quart to 1-gallon systems) or commercial-grade 5-gallon pails for continuous production, contract packaging, or OEM custom supply.
Quick Project Specification Checklist
| Project Parameter | Key Detail to Provide | Why It Matters |
|---|---|---|
| Artwork Medium | Acrylic, oil, print, mixed media | Ensures proper chemical adhesion and prevents substrate bleed |
| Pour Thickness | Standard 1/16″–1/8″ coating | Maintains self-leveling performance and efficient bubble release |
| Batch Volume | Single project vs. bulk/OEM supply | Determines whether standard 1:1 kits or bulk packaging best fits your setup |
| Turnaround Needs | Target working time (30–45 mins) | Guarantees proper pot life and tack-free handling within 12–24 hours |
How Can RW ATELIER Support This Project?
Applying a clear epoxy topcoat over artwork requires absolute optical precision, predictable curing, and the right technical backing. At RW ATELIER, we work directly with artists, professional studios, and galleries to ensure every pour delivers a flawless, glass-like finish.
Here is how we support your project from preparation to final cure:
- Dedicated Art-Grade Formulations: We supply crystal-clear, self-leveling art coating epoxy engineered with advanced HALS and UV absorbers. This prevents premature yellowing, clouding, or color distortion across delicate pigments and prints.
- Scalable Supply Options: Whether you are sealing a single canvas or running commercial production lines, we provide flexible sizing tiers—ranging from standard 1-quart and 1-gallon studio kits up to 5-gallon commercial pails.
- Direct Technical Guidance: We help you dial in exact project parameters, including maintaining recommended 1/16″ to 1/8″ layer depths, managing standard 30 to 45-minute working windows, and optimizing workshop temperatures for natural bubble release.
- Surface Preparation Protocols: We provide direct consultation on substrate readiness, helping you determine pre-sealing requirements for porous media, dried acrylics, cured oils, and photography before your main pour.
- Factory-Direct Reliability: Sourcing directly from our epoxy systems ensures batch-to-batch consistency in viscosity, optical transparency, and low-VOC safety, keeping your studio workflow predictable and repeatable.
